Enabling Burp Suite Proxy on Linux
03/08/2020
The Burp Suite proxy is a powerful tool for security researchers. It allows users to intercept and examine network traffics with efficiency.
Intercepting unencrypted HTTP traffics is straightforward by setting the proxy. But doing the same thing on HTTPS traffics requires extra steps since HTTPS is designed to prevent unauthorized interceptions. To intercept HTTPS traffic, the user must authorize the use of Burp Suite proxy by installing the provided Burp Suite CA certificate onto the target system.
Here are the basic steps needed to enable Burp Suite proxy on a target Linux system:
Certificate Export and Installation
Open Burp Suite. Export certificate from Burp in DER format in “Proxy” -> “Options”.
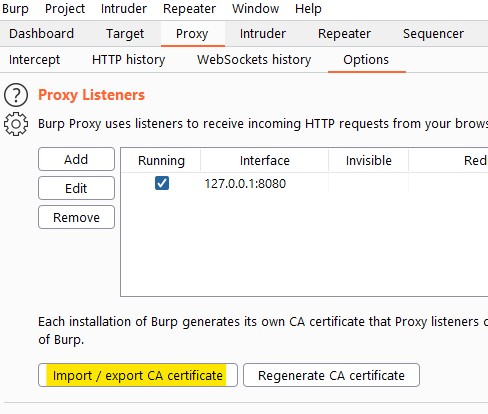
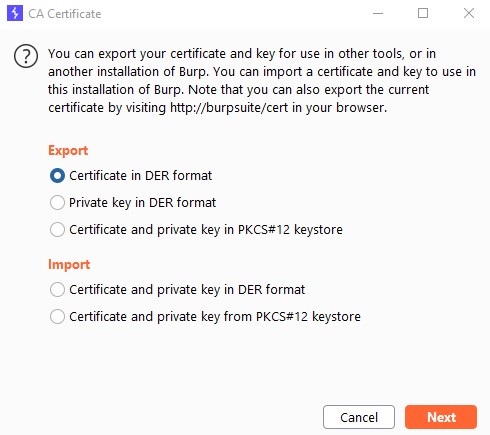
Copy the DER certificate to target Linux system.
Convert certificate from DER to PEM with openssl tool:
openssl x509 -in [cert.der] -inform der -out [cert.crt] -outform pem
Copy the PEM certificate to /usr/local/share/ca-certificates/
Update the CA store by running
sudo update-ca-certificates
The certificate should be imported into /etc/ssl/certs/ and accepted as a valid CA certificate.
...Read moreSetting Up SFTP Server on Ubuntu
02/12/2020
Install openssl-server and openssl-sftp-server via package manager.
Create a user group (“sftpg” for example) for SFTP users.
sudo groupadd sftpg
Create a user (“tester”) and add it to the new group.
sudo useradd -g sftpg tester
sudo passwd tester
Create a folder and set file permissions for user download.
Note: The owner and owner group for /sftp/ must be “root” while the same fields for /sftp/tester/ must be set as “root” and “sftpg” respectively.
sudo mkdir /sftp
sudo mkdir /sftp/tester
sudo chown -R root:sftpg /sftp/tester
sudo chmod 755 /sftp
sudo chmod 755 /sftp/tester
Also create a folder for upload:
sudo mkdir /sftp/tester/upload
sudo chown -R tester:sftpg /sftp/tester/upload
Edit /etc/ssh/sshd.config and append the following lines:
Match Group sftpg
    ChrootDirectory /sftp/%u
    ForceCommand internal-sftp
Restart ssh server:
sudo systemctl restart sshd
How to Produce a Buffer Overflowed Program in Modern Visual Studio
12/04/2018
To study binary security, it is very important for learners to write a program with buffer overflow vulnerability in order to understand how buffer overflow works. However, modern IDEs or compilers usually have default settings which prevent such thing from happening easily.
To write, compile and run a simple program with buffer overflow vulnerability, we need to change some default setting. This article will use Microsoft Visual Studio Community 2017 Version 15.9.6 as an example to illustrate the steps needed to produce a vulnerable C program.
The codes of the C program is:
#include <stdio.h>
#include <string.h>

#define PASSWORD "secret233"
#define BUFFER_SIZE 10

int check_pass(char *input)
{
    int compare = 1;
    char buffer[BUFFER_SIZE];

    compare = strcmp(input, PASSWORD);
    printf("[matched value]:%d\n", compare);

    strcpy(buffer, input);
    printf("[matched value]:%d\n", compare);

    return !compare;
}

main()
{
    int passed = 0;
    char input[1024];

    while (1) {
        printf("Enter password: ");
        scanf("%s", input);

        passed = check_pass(input);
        if (passed) {
            printf("--Password correct!\n");
            break;
        }
        else
            printf("--Wrong password. Try again.\n\n");
    }
}
Fixing Windows CMD Font Issue
10/22/2018
Problem
One day, I suddenly found out that the font in my Windows command (CMD) was changed by something into a bad-looking non-monospace font somehow.
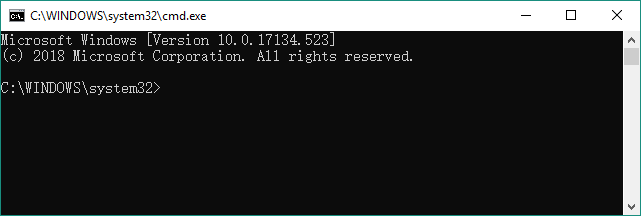
The same thing happened to my Powershell since they share the same profile.
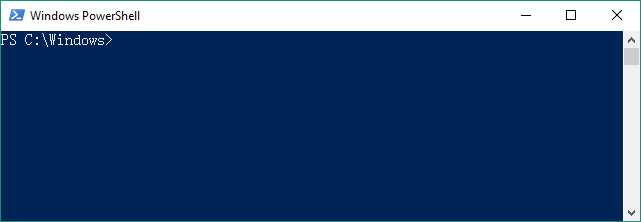
Such a bad-looking font was definitely unacceptable by a heavy command line user. So, it must be fixed. Normally, I could change the font by right-clicking the title bar, selecting properties-Font. However, it didn’t work this time since the fonts I wanted were missing.
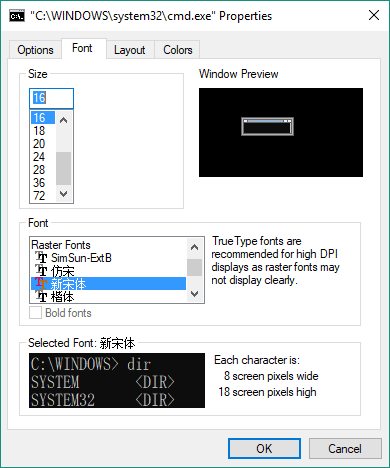
As the screenshot showed, the only available fonts were some Chinese fonts, which were useless in this case. So where did my programming fonts go?
...Read moreNew Syntax Highlighting Style Test - C++
08/10/2018
Just updated the code syntax highlighting style. This is a sample of C++ codes from btrForensics.
...Read more